Opening and Saving Files
- avicoren
- Nov 23, 2021
- 4 min read
Updated: Dec 29, 2021
When working with file interactions we need an elegant way of letting the user pick a file either for opening or saving it.
Thanks to Microsoft we have two classes that will give us the perfect solution.
Microsoft.Win32.SaveFileDialog
Microsoft.Win32.OpenFileDialog
Here we have a new example app to show you how to use those classes.
All of the examples on my posts are available on this GitHub.
Otherwise, Save the following pieces of code as files in your projects folder.
Save this code as Example2.xaml
<Window
    xmlns="http://schemas.microsoft.com/winfx/2006/xaml/presentation"
    xmlns:x="http://schemas.microsoft.com/winfx/2006/xaml"
    xmlns:materialDesign="http://materialdesigninxaml.net/winfx/xaml/themes"
    Name="MainWindow"
    Title="Examples"
    Height="500"
    Width="500"
    Style="{DynamicResource MaterialDesignWindow}"
    WindowStartupLocation="CenterScreen"
    ResizeMode="CanResize"
    TextElement.Foreground="{DynamicResource MaterialDesignBody}"
    TextElement.FontSize="14"
    TextElement.FontFamily="Roboto"
    TextOptions.TextFormattingMode="Ideal"
    TextOptions.TextRenderingMode="Auto"
    Background="{DynamicResource MaterialDesignPaper}" >

    <Window.Resources>
        <ResourceDictionary>
            <ResourceDictionary.MergedDictionaries>
                <ResourceDictionary Source="pack://application:,,,/MaterialDesignThemes.Wpf;component/Themes/MaterialDesignTheme.Light.xaml" />
                <ResourceDictionary Source="pack://application:,,,/MaterialDesignThemes.Wpf;component/Themes/MaterialDesignTheme.Defaults.xaml" />
                <ResourceDictionary Source="pack://application:,,,/MaterialDesignColors;component/Themes/Recommended/Primary/MaterialDesignColor.BlueGrey.xaml" />
                <ResourceDictionary Source="pack://application:,,,/MaterialDesignColors;component/Themes/Recommended/Accent/MaterialDesignColor.DeepOrange.xaml" />
            </ResourceDictionary.MergedDictionaries>
        </ResourceDictionary>
    </Window.Resources>

    <Grid>
        <StackPanel VerticalAlignment="Center" HorizontalAlignment="Center">
            <StackPanel Orientation="Horizontal">
                <Button  Name="Btn_OpenFile" Style="{StaticResource MaterialDesignFloatingActionMiniButton}" ToolTip="Open File" Margin="5">
                    <materialDesign:PackIcon Kind="FolderOpenOutline" Height="25" Width="25" />
                </Button>
                <Button Name="Btn_SaveFile" Style="{StaticResource MaterialDesignFloatingActionMiniButton}" ToolTip="Save File" Margin="5">
                    <materialDesign:PackIcon Kind="ContentSaveOutline" Height="25" Width="25" />
                </Button>
            </StackPanel>
            <TextBox
                Name="TextBox_Editor"
                Style="{StaticResource MaterialDesignOutlinedTextBox}"
                VerticalAlignment="Top"
                Height="300"
                Width="400"
                AcceptsReturn="True"
                TextWrapping="Wrap"
                VerticalScrollBarVisibility="Auto"
                Margin="0,10,0,0"/>
        </StackPanel>
    </Grid>

</Window>
Save this code as Example2.ps1
###########
#  Learn how to build Material Design based PowerShell apps
#  --------------------
#  Example2: Open and Save Dialog boxes
#  --------------------
#  Avi Coren (c)
#  Blog     - https://avicoren.wixsite.com/powershell
#  Github   - https://github.com/DrHalfBaked/PowerShell
#  LinkedIn - https://www.linkedin.com/in/avi-coren-6647b2105/
#
[Void][System.Reflection.Assembly]::LoadWithPartialName('presentationframework')
[Void][System.Reflection.Assembly]::LoadFrom("$PSScriptRoot\Assembly\MaterialDesignThemes.Wpf.dll")
[Void][System.Reflection.Assembly]::LoadFrom("$PSScriptRoot\Assembly\MaterialDesignColors.dll")

try {
    [xml]$Xaml = (Get-content "$PSScriptRoot\Example2.xaml")
    $Reader = New-Object System.Xml.XmlNodeReader $Xaml
    $Window = [Windows.Markup.XamlReader]::Load($Reader)
}
catch {
    Write-Error "Error building Xaml data.`n$_"
    exit
}

$Xaml.SelectNodes("//*[@Name]") | ForEach-Object { Set-Variable -Name ($_.Name) -Value $Window.FindName($_.Name) -Scope Script }

$InitialDirectory   = "$([Environment]::GetFolderPath("MyDocuments"))"
$FileFilter         = "Text files|*.txt|All Files|*.*"

function Save-File {
    Param (
        [string] $InitialDirectory,
        [string] $Filter
    )
    try {
        $SaveFileDialog = New-Object Microsoft.Win32.SaveFileDialog
        $SaveFileDialog.initialDirectory = $initialDirectory
        $SaveFileDialog.filter = $Filter
        $SaveFileDialog.CreatePrompt = $False;
        $SaveFileDialog.OverwritePrompt = $True;
        $SaveFileDialog.ShowDialog() | Out-Null
        return $SaveFileDialog.filename
    }
    catch {
        Throw "Save-File Error $_"
    }
}

function Open-File {
    Param (
        [string] $InitialDirectory,
        [string] $Filter
    )
    try{
        $OpenFileDialog = New-Object Microsoft.Win32.OpenFileDialog
        $OpenFileDialog.initialDirectory = $initialDirectory
        $OpenFileDialog.filter = $Filter
        # Examples of other common filters: "Word Documents|*.doc|Excel Worksheets|*.xls|PowerPoint Presentations|*.ppt |Office Files|*.doc;*.xls;*.ppt |All Files|*.*"
        $OpenFileDialog.ShowDialog() | Out-Null
        return $OpenFileDialog.filename
    }
    catch {
        Throw "Open-File Error $_"
    }
}

$Btn_OpenFile.Add_Click({ On_OpenFile })
$Btn_SaveFile.Add_Click({ On_SaveFile })

Function On_OpenFile {
    $OpenedFile = Open-File -InitialDirectory $InitialDirectory  -Filter $FileFilter
    if ($OpenedFile) {
        $TextBox_Editor.Text = Get-content $OpenedFile -Raw
    }
}

Function On_SaveFile {
    $SavePath = Save-File -InitialDirectory $InitialDirectory -Filter $FileFilter
    if ($SavePath) {
        $TextBox_Editor.Text | Out-File -FilePath $SavePath -Encoding UTF8
    }
}


$Window.ShowDialog() | out-null
Running the ps1 script, will show this windows

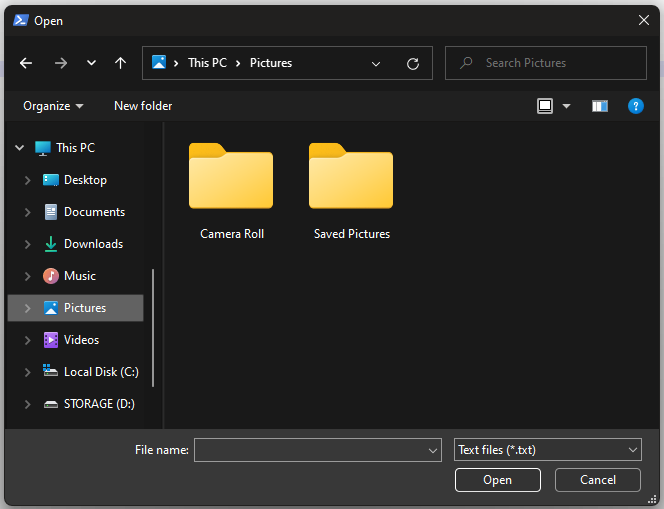
Clicking the "File Open" button (when you hover with your mouse it will show you a text (called a "ToolTip"). It's defined in the Xaml file, in this control's section), will open a standard Windows open-file dialog with all the shebang of the latest OS features. Here you see a Windows 11 dialog with a dark mode.

Everything works exactly as the user expects it to work. Note the filter that enables the user to see and select only text files or All files. It is programmable of course. You just define the filter as |Description|*.extension like: |CSV files|*.csv
Choosing a file will populate its content in a textbox control. It will even display a nice scrollbar as the content is too large to fit the screen. It also wraps the text.

You can make changes to the text and save it either to a new file or overwrite the existing one. All is done in an elegant way with familiar dialogs interface.
And how is this magic being done? quite easily!
There are three Xaml controls:
Two circular buttons with this style attribute
Style="{StaticResource MaterialDesignFloatingActionMiniButton}and one textbox with this style attribute
Style="{StaticResource MaterialDesignOutlinedTextBox}"That's all. The beauty of simplicity.
'StaticResource', by the way, means that we have loaded those controls design details (instruction of how to build them on the screen) so WPF will not look for them every time it wants to use a control.
The Defaults.xaml that you see at the top part of the Xaml file is the one contains the common controls like buttons, textboxes etc.
When you don't preload them, you need to use 'DynamicResource' instead.
Also, I wanted to show you that controls and attributes can be written in one line (like the buttons) or splitted into lines for each attribute (like the textbox) and it can also be a mix of them both. Xaml won't mind you breaking lines.
The icons for the buttons are defined with the element <md:PackIcon> and its attribute 'kind'. You can pick a kind from the demo app under the 'icons' section.
As for the PowerShell code, we defined two functions that use the above classes, Open-File and Save-File. You can reuse them on every script you write, just Copy-Paste them. Then, we added a click event for each button.
Instead of writing block of PS code inside those events, we call a function for every event. Much easier to read and maintain.
Finally we defined the two functions for those events: On_OpenFile, On_SaveFile which do the logic we wanted.
One thing to note - on both 'On_Event' functions we use $TextBox_Editor.Text which holds the content of the textbox. So $TextBox_Editor is a 'TextBox' Object that has the property 'Text' which holds the content of this control.
It has a lot more properties that we are going to cover later on.
There is also an event called FileOk so you can trigger stuff after an OK click.
Now go ahead and start opening and saving files!

Comments